Valley Hatchery Guide to Raising Mail-Order Poultry
The joyful chirping of baby birds heralds the beginning of a rewarding journey. As you welcome these delightful additions from Valley Hatchery into your home, it’s essential to get ready for their arrival. This comprehensive guide to raising and brooding baby poultry equips you with the knowledge you need. In this article, we provide tailored insights for brooding all bird varieties we offer, including chicks, ducklings, goslings, turkey poults, and guinea keets, ensuring all their unique needs are met with care.
Tip! Save our number (1-800-652-7606) AND your local post offices phone number when expecting a live shipment from Valley Hatchery. This ensures you recognize calls for vital shipment matters promptly. Time is crucial for live shipments!
Supply Checklist
- Brooder
- Bedding
- Heat Lamp
- Thermometer
- Feeder & Waterer
- Starter Feed
- Apple Cider Vinegar w/ Mother
- Electrolyte Packet
Brooder Setup for Baby Poultry
Creating a Cozy Home: Your brooder is the safe haven for your baby birds. It should be spacious enough for them to eat, drink, sleep, and play comfortably. Avoid making it too large, as this might lead to temperature challenges. Baby birds rely on the brooders warmth since they can’t regulate their heat. The brooder should be safe from predators and drafts.
Brooder Placement: Pick an indoor site like your home or garage for your brooder but ensure not to keep poultry in your living area. Avoid buildings with unstable temperatures. You will want to prioritize a stable temperature, predator-proofing, weather resistance, and ventilation.
⚠️ When brooding indoors, avoid teflon-coated cookware and be cautious of scented items like sprays, candles, and aerosols, as they’re toxic to birds.
Accessibility Matters: An ideal brooder is easily accessible for swift maintenance. This ensures a clean and welcoming environment for your baby poultry.
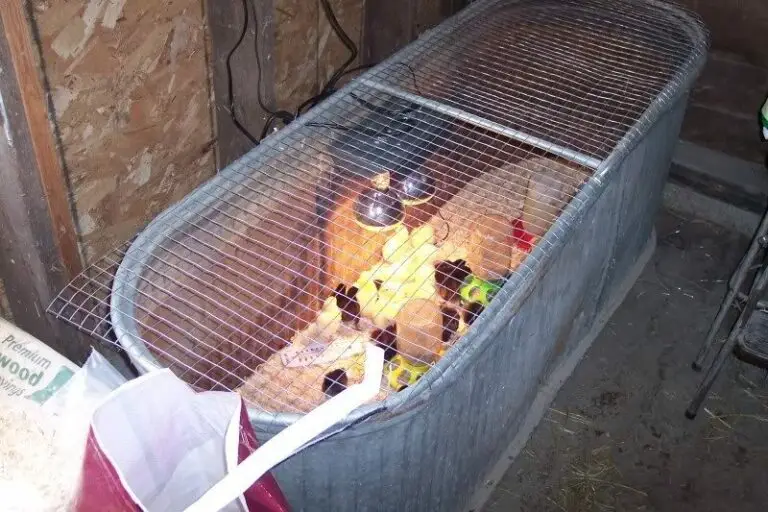
Choosing the Right Brooder: Consider using stock tanks, melon/pumpkin bins, or poultry brooder panels. Avoid storage totes, cages, or aquariums. If your brooder lacks a top, fashion one from chicken wire. They can start to fly quickly!
Sufficient Space: Though small, baby poultry require ample space to thrive. Ideally, the brooder should offer around one square foot of room for each baby bird, and it’s recommended to have a height of 12-15 inches to prevent easy escapes. They’ll stay in the brooder for 5-6 weeks, so space matters. The required area varies by breed. As the birds grow, observe for crowding signs, and upsize when needed.
Choosing Safe and Practical Brooder Bedding: Pine flakes or shavings are the most practical bedding. Do not use sawdust, sand, coffee grounds, cedar, cypress, straw, or hay. All are potentially dangerous to baby poultry. The material must be dry and easy to replace regularly. Changing bedding should be frequent. It is recommended to replace the bedding at minimum every other day until they transition to coop.
Checkout these Brooder Quick Tips on our Blog!
Initial Care Upon Arrival
Have your waterer clean and full of warm electrolyte water (Sav-A-Chick or if not available mix 3 tablespoons of sugar to 1 quart of water.), have your feeder clean and full with Starter Feed. The required temperature should be established in the brooder before birds are placed in it. Because of the instinctively roaming nature of most birds generally they find the food and water without any assistance, as long as it’s available. However, we recommend gently dipping each birds beak in the water as you unbox them and introduce them to the brooder. After the birds have had time to acclimate, the electrolyte water can be removed and replaced with warm tap water. Baby poultry should not be given cold tap water, the warm water helps avoid the birds systems being shocked.
Unlike their counterparts, turkey poults can sometimes pose a challenge in terms of initiating feeding. We’ve prepared an informative blog on turkey poult care, accessible here!
Maintaining Ideal Brooder Temperature
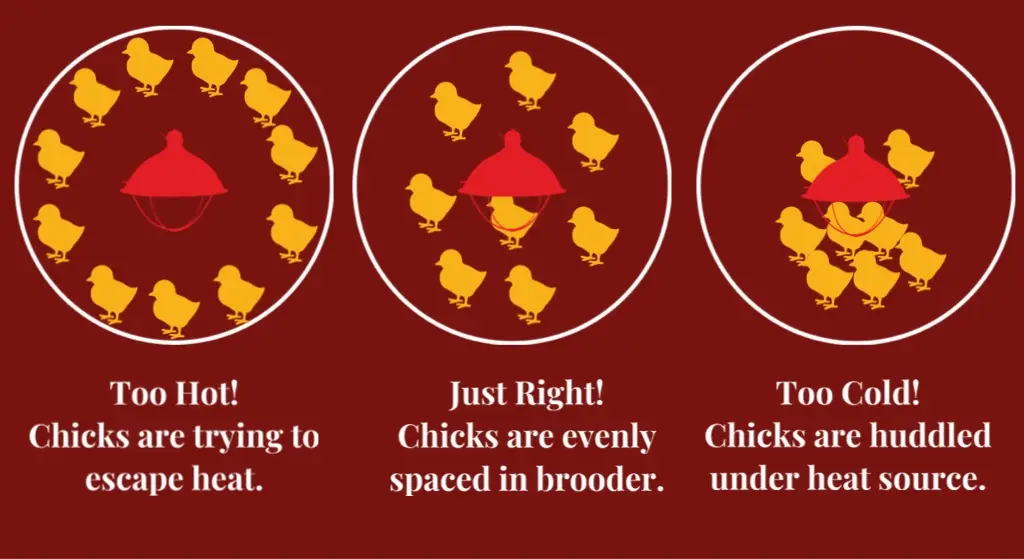
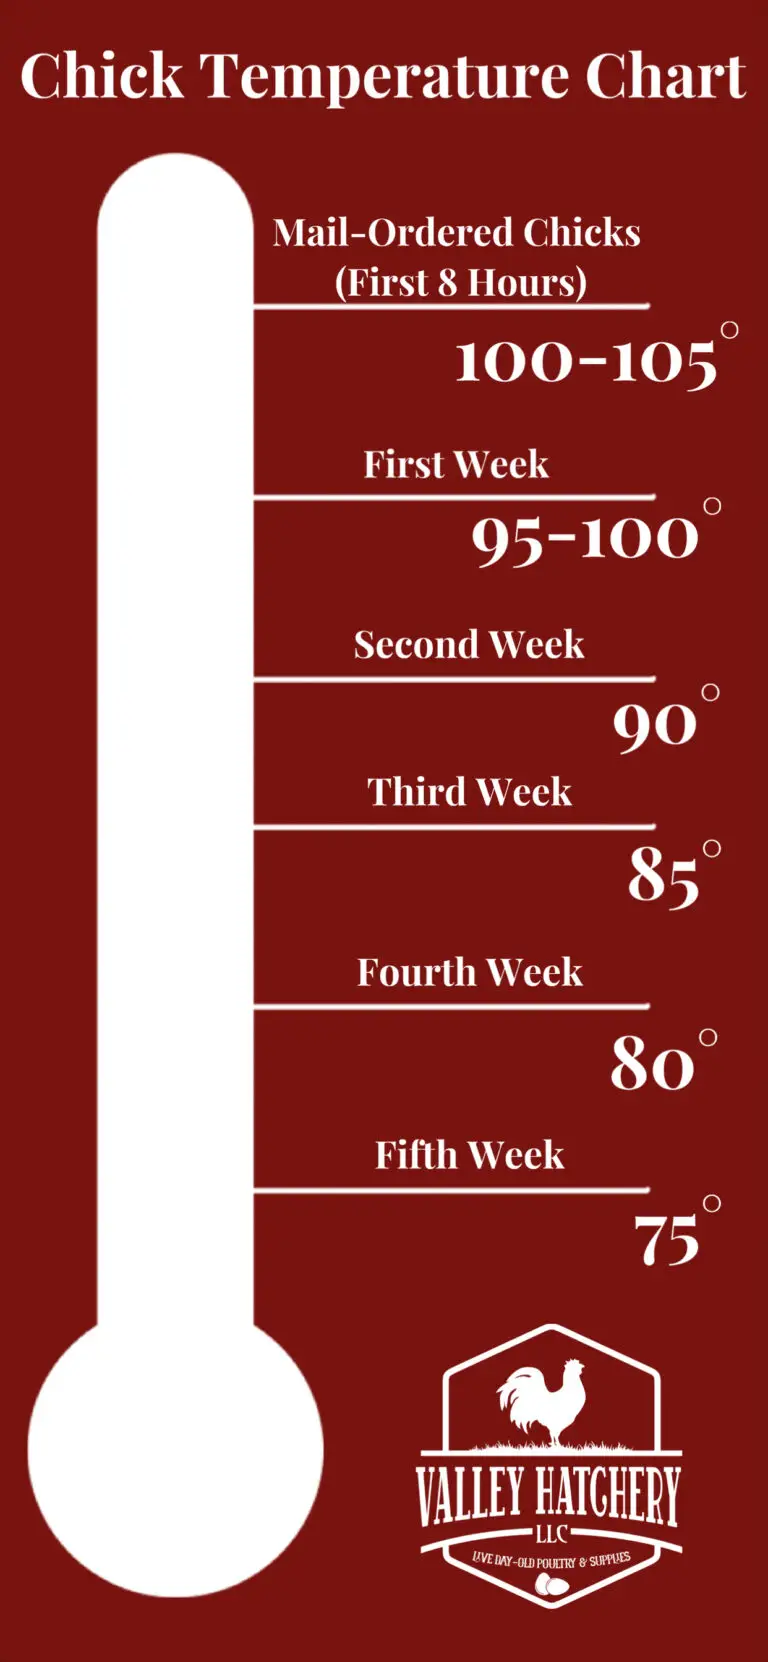
The brooder’s temperature is the most important in the first few days of the bird’s life. The brooder lamp is an essential part of the setup. A thermometer should show 100-105 degrees Fahrenheit in the brooder before birds are placed in it, and it should continuously remain on that temperature for the first eight hours. It is important your brooder is setup so that birds can escape direct heat, there should be enough room the birds can move away from the heat source.
Observing your birds will indicate the conditions. Baby poultry tend to chirp loudly, group, and pile up when it’s cold, which can lead to suffocation.
Note: Waterfowl (ducklings and goslings) do not need as much heat as baby chicks because of their rapid rate of growth.
Mail order birds have been through two to three days of transit. Transit can be stressful, and the birds can lose body mass. They require a lot more heat on arrival compared to baby poultry hatched at home or picked up at a feed store.
We recommend using a heat lamp for at least the first seven days. After seven days, it is safe to transition to a heat plate, if desired. Upon arrival, the floor temperature under the heat lamp should be 100-105 degrees for the first eight hours. Heat lamps are crucial for the success and survivability of mail ordered poultry. When mail order birds arrive their body temperature is low, the heat lamp provides heat and warms the air around them. Baby poultry normal body temperature is around 104 degrees, the heat lamp will aid in getting the birds body temperature up after being shipped. Heat plates do not provide enough heat to successfully raise mail order poultry. Precautions should be taken to safely use a heat lamp; the safety guard should be attached as well as double securing your lamp.
Gradual Temperature Adjustment: You will eventually move your birds outside, so it is important to adjust them to outdoor temperature gradually. The first eight hours in the brooder, keep it at 100-105 degrees. After the birds are acclimated and have warmed up after their journey, then it can be kept at 95-100 degrees, once the birds are a week old, you can start lowering the temperature by 5 degrees weekly.
Light: Brooder lamps provide birds not only with heat but also light. The lamp should stay on 24 hours a day. If you use a heat lamp the entire time brooding birds, one week before moving birds outside, you should turn the lamp off during the nighttime to adjust the birds’ night-day cycle.
⚠️ Teflon coated bulbs are toxic to baby poultry!
Note: Adjustments in temperature might be necessary for various types of poultry. Bantams and other small-bodied birds could benefit from a slightly elevated temperature. On the other hand, larger birds like Jumbo Cornish Cross, due to their rapid growth and heightened heat sensitivity, might require a slightly reduced temperature to prevent overheating.
We offer additional information on why we recommend heat lamps for mail-ordered poultry here.
Ensuring Clean Water Supply
Water is a vital necessity for poultry at every life stage. Keep these guidelines in mind to safeguard your birds’ health:
- Dirty water sources contribute to disease, making clean dishes crucial.
- Birds can contaminate water with food particles.
- Opt for specially designed water dishes from Valley Hatchery.
- Plastic or metal waterers are easy to sanitize and prevent bird entry.
- Maintenance Matters – Change water multiple times daily to maintain cleanliness.
- Sanitize the waterer every few days for optimal hygiene.
Special Considerations:
- Avoid using open water sources like bowls or dishes; they can cause chicks to become wet, leading to lower body temperature and mortality.
- For guineas and turkeys, prevent drowning risk by adding marbles or clean stones to the waterer base for shallower water.
- Take caution with waterfowl: Limit their initial water intake to prevent chilling. Upon arrival, provide water for 20 minutes, remove for 20 minutes, and repeat 2-3 times before allowing constant access.
Feeding Baby Poultry
Every farm store has a variety of starter food. Starter food for baby poultry refers to a specially formulated feed with higher protein content that provides essential nutrients for their initial growth and development stages. Starter feed is typically offered to baby poultry for the first 6 to 8 weeks of their lives before switching to grower feed. Grower food for baby poultry is a feed formulated to support their continued growth and development after the initial stages, containing slightly lower protein levels than starter feed. Some feed suppliers offer only a combination starter/grower ration. In that case, feed the combo ration until it is time to transition to adult feed. Baby poultry are typically transitioned from starter/grower feed to normal adult/maintenance feed around 16 to 20 weeks of age, the exact timing can vary – always follow the recommendations from the feed manufacturer on the feed label. We recommend speaking with the Nutritionist at your local feed mill to learn about the feed options available to you.
Tip! When you welcome your newcomers to their brooder, sprinkling crumbled boiled egg yolk over their feed gives them a boost after shipment. Remember to tidy up and remove untouched egg yolk after 2 hours.
Feed Recommendations for Starting Baby Poultry:
Chicks: We recommend using 18-20% protein chick starter.
Broiler Chicks: We recommend using 20-22% protein broiler starter.
Turkey Poults & Guinea Keets: We recommend using 28-30% protein turkey/game starter.
Ducklings & Goslings: We recommend using 20-22% protein waterfowl starter. (Waterfowl starter is important due to the higher Niacin offered to prevent common leg issues in waterfowl. Note: If a specialized waterfowl starter is not accessible, you can enhance chick starter with food-grade brewer’s yeast at 3½ cups per 10 pounds of feed until laying begins. Once laying starts, niacin supplementation is unnecessary.)
How Much Feed: Baby poultry are known for a constant appetite. They are always hungry and in search of food. Never let your birds run out of feed. Exception: Begin restricting feed intake for Jumbo Cornish Cross at 2 weeks of age by withholding feed during the night. This practice aids in slightly slowing the bird’s growth, enabling their skeletal framework to synchronize with swift muscular progress.
Feed Storage: Food should be stored in a dry, sanitized, and pests-free area. Mice and rats can contaminate food with various diseases and parasites.
Medicated Feed: Medicated starter feeds are carefully formulated with a specific medication to address coccidiosis. This medication, amprolium, is formulated in the feed in smaller quantities, enabling young chicks to gradually develop immunity as they mature. While appropriately reared poultry typically do not necessitate medicated feed, some caretakers choose it as a preventive strategy. Amprolium, the medication used, does not have a withdrawal period for meat-producing birds. Nevertheless, its primary function involves obstructing thiamine (vitamin B1) absorption. Thiamine is vital for growth and vitality in all organisms. On occasion, thiamine deficiency stemming from the medication can result in neurological symptoms and health complications among birds. Numerous poultry keepers favor employing non-medicated feed and only administering coccidiosis treatment when required. This strategy facilitates the use of supplements following amprolium treatment to counter any concerns linked to B1 inhibition. Read more about Coccidiosis on our Blog here.
Feed & Treats: It’s generally recommended to wait until baby poultry are around 5 to 6 weeks old before introducing treats into their diet. This allows their digestive systems to develop and adjust to their primary starter or grower feed. At 5-6 weeks you can slowly introduce treats in small amounts, and make sure they’re appropriate for the age and type of poultry you’re raising. As the birds mature, you can gradually increase the variety and quantity of treats, always ensuring that treats complement their nutritional needs rather than replace their balanced feed. Once you introduce treats to baby chicks, you will want of offer free access to Chick Grit.
Lethargic Birds
If the birds are lethargic or have pasty butt starting, add 4 tablespoons of Raw Organic Apple Cider Vinegar (with the mother) to every quart of water for 3-5 days.
Shared Brooder Spaces
Most Standard Large Fowl Chicks can be brooded together. Guinea keets, bantam chicks and smaller ornamental breeds should be brooded separately due to their smaller size. Turkeys can be brooded with large fowl chicks. Waterfowl should always be brooded separately from other types of fowl.
Introducing the Outdoors
When birds start flapping their fully feathered wings and even fly around the brooder, it’s a good sign that they are ready to change the environment. This transition happens around 5-6 weeks of age. That’s the time when baby birds also start to look like mature birds, only smaller in size. It’s important that the temperature outside is warm enough and the chicks are acclimatized. Birds newly introduced to their new environment, should be alone together for a week or two to get familiar with it, know where the food and water are, and destress from relocation. After this adjustment period, it is all right to let them free-range and merge with the older flock. Letting chicks outside too early can lead to many issues.
Safe Handling of Live Poultry
Always wash your hands with soap and water before and after handling poultry. Precautions need to be taken when handling and caring for live poultry, to prevent fecal/oral transmission. Live poultry can be a source of potentially harmful microorganisms. Adults must supervise children when handling poultry to ensure they do not put their hands or fingers into their mouths. Do not keep poultry in the family living space. Click here for tips from the CDC on Healthy Families & Flocks.